Feature management in D365 is packed with functionality and it might be a job and a half to stay on top of and to remember that some features can greatly improve someones workday. Warehouse management app data inquiry flow is one such feature. Although the name doesn't exactly roll off your tongue, this is a very useful tool to relieve some hassle for your warehouse workers.
This feature lets you create predifined queeries to find lists on different tables from the D365 SCM solution, and enable looking up the information you need within the workflow on the mobile device.
It could be finding a list of all POs with delivery date today, og all Shipments planned for today or this week.
In this post: enable feature, related features, create mobile device menu item, create a mobile device step detour, end result.
Microsoft writes about this functionality in their Learn library here.
Enable feature
Go to Workspaces > Feature management. Search to find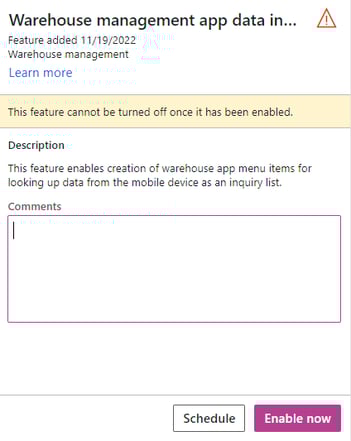
Warehouse management app data inquiry flow
The right hand panel on your browser window will now show data about this feature, including a short description. The learn more link will send you to a Microsoft Learn page which usually holds a much more comprehensive description and/or guide to use the feature. There is a button to enable the feature on the bottom of the panel, together with a button to schedule enabling the feature if you for example wish to enable it when no users are online.
As the image indicates, this feature cannot be turned off once it has been enabled. This is a warning that you will not be able to regret enabling the feature. Reason for this can for example be that some tables will be activated as part of enabling and this creates relationships to other tables in the solution that are not easily backtracked.
Related features
Some other features are necessary to enable in order to use the feature discussed in this post and depending on which version of the system you are on these might be now mandatory or default enabled.
Warehouse app step instructions (mandatory pr 10.0.29)
Warehouse management app detours (default enabled pr 10.0.29)
Auto-submit detour steps for the Warehouse Management mobile app (recommended)
The environment used to illustrate this blogpost has all these features enabled.
Example of use
For my use example I will highlight another new feture that was made available recently called Pack containers using the Warehouse Management mobile app, which enables Creating, packing, printing and closing containers with the mobile app. The menu items for packing items into containers and for closing container ask for the container ID to fulfill the task. However, If you created the container using the app, you normally will not have the container ID at hand and available to scan. Packing and creating can easily be combined using the detours feature. But you might not always want to do these steps together, you may want to create all the containers necessary for a shipment and have them waiting to be ued at packing station. Then you need to have a look up, or data inquiry available.
Create a Mobile device menu item
Go to Warehouse management \ Setup \ Mobile device \ Mobile device menu items
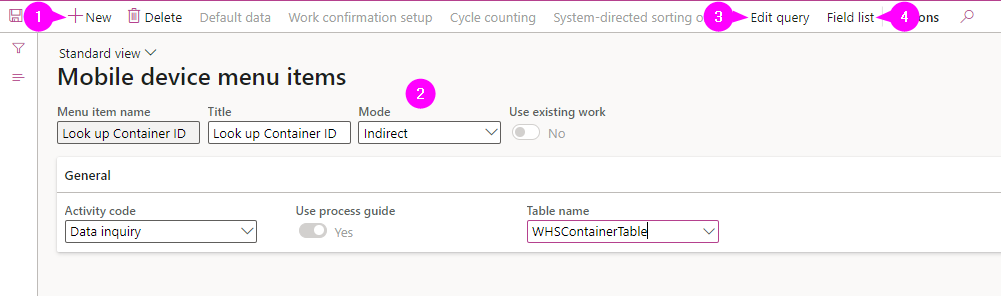
1. Click New to create a new menu item
2. Fill inn the necessary fields
Menu item name: Select an appropriate name
Title: Select an appropriate Title (can be same as name as shown in example)
Mode: Indirect
Activity code: Data inquiry (this is a new activity code introduced by enabling the feature)
Table name: select the table where you will collect data from
3. Click Edit query.  This is the same type of query as when using advanced filter or sort other places in solution.
For the created date and time field I have used a SysQueryRangeUtil method. There are several of these listed on this page that are very useful in creating relative date intervals for advance queries.
For this example the relative date interval is today, so I will only lookup containers created today.
I've also filtered on the list to only retur containers with status open og packing as I am not interested in those allready closed.
For the line looking at field Shipment the criteria box is empty. This will then be available for the user to fill in, scanning the shipment ID they are packing for to further limit the data returned, but the system will require the user to add some data for this field. If no data is available they can enter a * to receive all posts that are still relevant within the other criteria.
A company could as an option premake two separate menu items. One could be Find all containers created today (where no criteria value was left open). THe other could then be Find Container for shipment (where only the open criteria shipment filter was specified).
Close the query window clicking OK
4. Click Field list.
Here you can select up to 8 fields to display in order to identify the correct record. The fields must include any fields you may want to return from a query. (this becomes relevant later in the blog post)

Save and close the Field list form
Add to Mobile device menu
Some lookups are more relevant than others to want to make available directly from the menu. This example may not be the most relevant but we will keep this step in as it would be relevant for many of the inquiries we would create.
Go to Warehouse management \ Setup \ Mobile device \ Mobile device menu
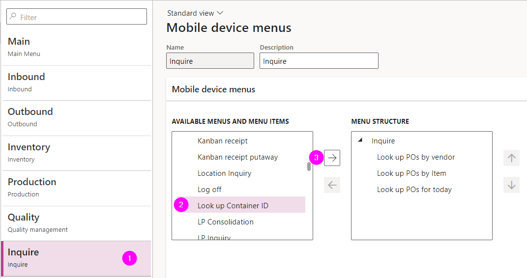 I have made a container for menu items called Inquire (1). Under Available menus and menu items i find the menu item I created (2) and click on the arrow (3) to add to menu structure. Once there, I will be able to move the menu item up or down in the list of menu items
I've also added the Inquire menu as an element in the Main menu stucture.
Configure a Mobile device step detour
This is where we add an option to lookup records whilst in a work flow.
Go to Warehouse management \ Setup \ Mobile device \ Mobile device steps
If the table is blank you'll need to start by clicking the Create default setup menu item in the action pane.
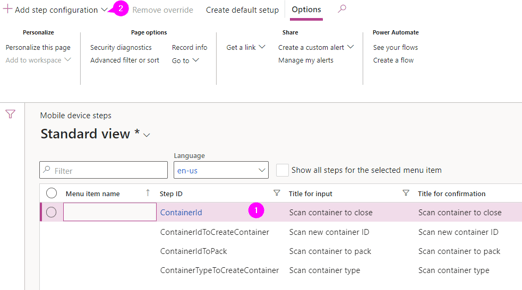 This list is all the work steps from the mobile app. We need to identify the step where we want to do a lookup. In the example I'm creating I want to identify the steps where Container ID is the input. Therefore I've used contains container as filter in the step ID column and begins with Scan as filter in the title for input column (1).
I mark the step ID I wish to create an action item for (1) and Click on Add step configuration (2).
In the Add step configuration dialog you are asked to provide the menu item that initiates the workflow where you need the lookup. In my system I chose a menu item called Close Container and clicked "Add"
This creates a unique record in the Mobile device steps which is a combination of the Menu Item and the Step ID. For this post you can add specific input text or instructions for your company, or as we will do here - add a detour
In the Available detours fast tab, click on Add, then select and click OK in the dialog pane for the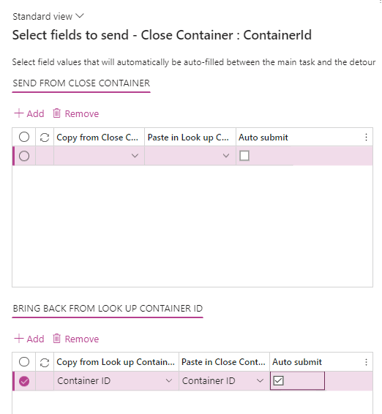 menu item we created Look up Container ID.
Back in the Available detours fast tab a new detour is created. Click on Select fields to send. This opens a new dialog pane to configure the detour. In the Bring back from Look up Container ID section I've selected that the field Container ID should be copied into Container ID field in Close Container flow.
Ticking the Auto submit option should save the user from having to confirm that they want to add the chosen container ID to the flow.
End Result
So, that was a lot of setup explained, but what does all this mean for the user of the mobile device app? I've made a little illustration that'll show what our example looks and behaves like in the app.
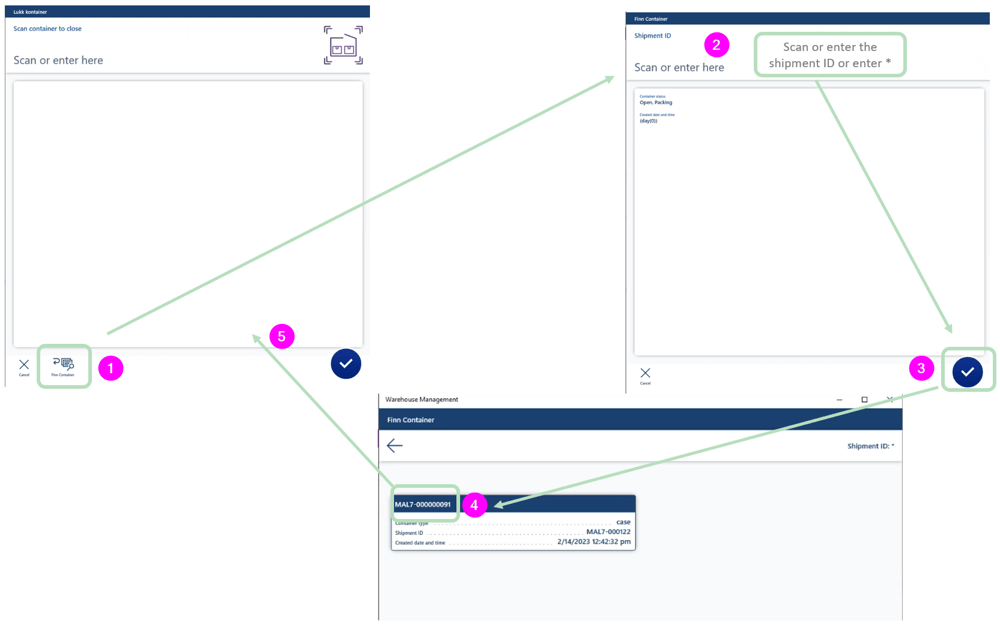
The user opens the menu item to Close container. On the step that asks the user to scan container to close, a detour menu item (1) is available to click on. Clicking on it opens the query we made. In the example the user is asked to scan shipment, but can opt to enter * to display all containers created today (2). When user click on the check mark (3), a list is returned for containers that fall under the filter, with identifying fields that we defined previously in the field list. (4) Clicking on the record returns the defined data (Container ID) to the original flow to continue the process of closing the container.
About the author:
Bente Lindtner is a consultant at Knowit Insight Business Solutions.  Since the early 2000s Bente has worked with D365 and its legacy systems. Bente focuses on functionality and processes within sales and supply chain management.
About Knowit Business Solution
Knowit is one of the fastest growing partners of Microsoft within Dynamics 365. In record time we have established ourselves as a significant business consultant within ERP & CRM, with expertise in Dynamics 365 Finance & Supply Chain, CE, Azure and PowerPlatform (PowerBI, PowerApps, PowerAutomation etc.). With extensive experience from medium-sized to the largest ERP projects in Norway/the Nordics, we can offer interdisciplinary expertise within other services and products from Microsoft. We currently work with a number of large and well-known customers within Construction, Engineering, Project, Production, Trade & Distribution and Enterprise customers with complex needs.
Would you like to know more about our knowledge in advanced warehouse? Would you like to discuss how Knowit can become your preferred partner to assist you in getting the most from your business solution systems? Click the button to find out more and get in touch: